Thursday, April 22, 2010

Chocolate Mint Chocolate Chip Cookies - April 2010

What better way to de-stress and chill out on tax day than with chocolate-y, minty goodness in the form of cookies?

Lila, who is an old pro at making cookies and intuitively understands the basic "made from scratch" cookie recipe (as opposed to my more commercialized "slice and bake" experience), set to measuring and mixing the dry ingredients in a bowl while I measured out (Earth-Balance non-dairy) butter to melt, set the oven to preheat, and fished out the cookie sheets and parchment paper.

Next, Lila took over measuring the butter and sugar together while I made an "egg" using Ener-G Egg Replacer. Since I was only making one, I used a bowl and fork. It ended up a bit frothy, but a good consistency. I added those and the vanilla and mint extract to the dough. I was surprised to find that the Peppermint extract was clear. Luckily I measured it over an empty bowl, because I set the measuring spoon overflowing, and having that happen over the dough may have resulted in mint-overload.

Lila stirred all the ingredients together, adding the chocolate chips in last. Since we had bad experience in the past with cookies that had too much spread we gave these cookies extra space.


The recipe called for 10-12 minutes in the oven. We checked the cookies at 8 minutes, again at 10 minutes and then took them out of the oven at 11 minutes. It was a little tricky to tell when the cookies were done due to the cocoa powder in the mix. The cookies were dark, and because of that we had no real visual cue of the edges browning. Lila was looking for the cookies to spread as a cue, but they didn't do that either.

We starting taking them off the cookie sheet and onto the wire racks, and discovered that warm, the cookies were very soft. Once we got to the second cookie sheet, I realized I could simply lift the parchment paper, with the cookies still resting on it, and place the whole thing on the wire racks. This ended up working quite well for us.


Thinking ahead to the bakery, we realized we would either need to prepare bundles of cookies, or make larger cookies. We were unsure if making larger cookies would require different baking time, we took the remaining dough, and made 4 large cookies.


We baked these for 10 minutes, then added a minute. When we took them out of the oven, they were still a bit poofy, but they spread nicely as we let them sit. We did leave these on the warm cookie sheet longer than the smaller cookies, and we are keeping in mind that may have affected how the cookies came out (which was utterly delicious and soft, by the way).


The large cookies were a lot softer than the smaller cookies, but first day trial, the larger cookies were still warm. A taste test the following day proved that still held true.

Lila observed the cookies had a good dough to chip ratio, which I agree (important because the dough also had the cocoa power in it), though we may try to cut down the sugar to a scant 1/2 cup granulated sugar, as the cookies became too sweet if you tried to eat more than a single small cookie.

All in all, this was a baking success, and all our friends loved the cookies. I look forward to baking them again.


New tools / ingredients: Peppermint Extract
Recipe used: The Joy of Vegan Baking
Co-baker: Lila
Date: April 15, 2010

Monday, April 19, 2010

Classes

We fell away from our weekly baking as we got busy with various other projects, school, etc, but with the new year, I felt a renewed passion for this project. In addition to resuming baking, the purchase of The Joy of Vegan Baking, and checking out various other vegan cookbooks from the local public library, I decided it was time to look into the business aspect of opening a cafe.

I know there are people who follow their passion and figure out the business side of things once they're both feet in the water, but personally I am more of a planner, a learner, and besides, I still need more time to work out the baking side, as well.

Some research turned up three different paths available to me via local learning channels. The University where I work offers a slew of MBA programs, ranging from the traditional classroom, 2-year program, to online programs and even a "weekend MBA." Currently the university also has among it's benefits to full-time employees, an Employee Education Program (EEP), which will pay for up to 6 credits a semester, and many of these programs fall under the program qualifications, which would leave me to pay some fees and books.

Our city's Chamber of Commerce offers online self-paced classes through SmallBizU(which look like large slide-show presentations) for about $25 a class, less if you are a member.

The last option was at the local community college, which offers a few different business certificate programs (instead of degree programs), including one in "Entrepreneurship and Small Business Management." In the end this seemed like the best option for me as the this program is also covered by the EEP, most of the classes are offered online, but with a teacher leading the courses, and other students to interact with, and all in all it was less confusing and overwhelming a choice over trying to figure out which MBA program was the best fit.

I applied and was accepted to the program and start the first of six classes May 10th. The certificate includes: Introduction to Business, Principles of Finance, Small Business Management, Principles of Accounting 1, Principles of Marketing and Human Resource Management.

I finish the courses April 2011 (I'm stretching it out over three semesters, instead of the traditional two (hey, I still have a full-time day-job to keep up with, and baking in the evenings). Hopefully, when I'm done, I'll have a better understanding of the scope of this project, and be able to make a better decision about moving forward with it.

And while I'd love for my girlfriends to join me in the endeavor, I realize that it might not be the right move for all of us. Right no, though, I am interested in pursuing it a little more seriously, and see what we (or I) can make of it.

Thursday, April 15, 2010

April 8, 2010 - Solo Mission: Rice Pudding

Last week I tried out the Rice Pudding recipe from The Joy of Vegan Baking. In addition to the recipe, the book provides a sidebar with variations and suggestions. One of the variations was to use jasmine rice, which is the only "normal" rice I had in my pantry (the others being boil-in-a-bag rice, sushi rice, and Spanish rice).

I was a little unsure about the flavors (spices, etc.) that would go with jasmine, so I searched online for Jasmine Rice Pudding recipes. Some were savory, and the two I could find seemed similar to the recipe/variation from the book also mentioned vanilla and cinnamon, so I kept to the recipe with the jasmine rice being the only substitution.

The hardest part of the recipe was determining when to take the rice off the stove, the cue being when the rice is tender. I had no baseline concept for what "tender" was, and the 25 minutes the recipe suggested ended up being too long.

Part of the problem was the initial ratio of milk (I used soy) to rice, 2 ½ cups to 1/3 cup, surprised and overwhelmed me. The grains of rice got lost in all that liquid.

I stirred the rice, milk and salt for 20 minutes and decided the rice was finally tender, at which point I added the sugar, cinnamon and vanilla. The recipe said to return the pan to the stove and mix until thickened. I looked at the much-condensed blob in my pot and decided I had probably made it past "tender" and to "thickened" before pulling it off the heat to add the rest of the ingredients. Afraid it would be too dry, I added a splash more soy milk (about two tablespoons, maybe?) And finished the recipe.

I did not sprinkle extra cinnamon on the pudding, guessed about how much raisins to add, since I had already put my measuring cups away, and transferred the rice pudding into one large bowl instead of six serving dishes (I'd have had to use the cups my tea set if I wanted to do this)

It went in the fridge to cool.

My sister proclaimed the dessert tasted like an oatmeal cookie, and I couldn't argue with that. I think I lost the additional flavor the jasmine rice would have added by sticking to the vanilla and amount of cinnamon listed in the recipe.

I'm eager to mix it up and try some of the variations – different milk, spice and flavoring options – to see what kind of tasty treats I can come up with, though the constant stirring I did while the rice was simmering did leave my arm tired, so I'll probably space the out these trials to give my arm break.

Sunday, April 11, 2010

March 28th - Pie Crust & March 30 - Apple Pie

March 28th: Pie Crust – Solo Mission

In anticipation of making an apple pie on Tuesday with Lila, I set out to pre-make the pie crust, based the recipe from the Joy of Vegan Baking.

Not only are there 2 pages of directions for good pie crust making, but I was pleased to find the chapter intro was a list of tips for making crusts.

I measured out all the ingredients into separate bowls and set them all in the freezer half an hour before I began (well, 45 minutes because I had to eat dinner, but that only meant the water had a little more ice)

The recipe called for mixing the non-dairy butter and vegetable shortening into the flour/dry ingredients in the food processor. I quickly determined that (Through persistent trial of following the letter of the instruction) that my Oster must be a smaller capacity than the food processor the author was working with, and I had to split the dry goods, cold butter, and shortening into roughly half to combine in two batches.

Next time I'll either measure out by a half at the get go, or find another way to mix these ingredients.

Once the ingredients were all mixed, I took my two batches of crests and made discs and wrapped them in plastic wrap to sit in my fridge (in a Ziploc bag) until Tuesday, when were make him the pie. The pieces weren’t the most cohesive, but I figured that would lend to the flay crust I was after.


March 30th: Apple Pie

Lila came over and I pulled out the two pie crusts from the plastic bag in the fridge. Putting down overlapping pieces of wax paper on the counter, with flower sprinkled on them and the rolling pin. I rolled out the larger of the two refrigerated balls of dough – Lila keeping the flour on the pin. I had a bowl of ice water at the ready to repair any tears, and had to take my best guess as to how much a 13" diameter was. Because of the crumbly nature of the crust, it was a little tricky to transfer to the dis. We eventually turned the pie pan upside down over the crust, and flipped both over, the extra flour from wax paper fell onto the counter.

We pressed the crust into place, then Lila rolled out the top crust, which held together less well than the larger one. We folded it in the wax paper and set it back in the fridge.

Using an apple corer, a vegetable peeler and a knife we prepared 5 apples: 2 tart granny smith and 2 juicier red delicious, for the pie.

The slicing and peeling took a lot longer than we thought. Lila juiced half a lemon to get the 1 TBSP fresh lemon juice the recipe called for. We used granulated brown sugar, and 2 /12 TBSP flour (the recipe called for between 2 and 3 TBSP) We ended up adding all the lemon juice Lila had made (almost double what the recipe called for – she is quite skilled with the juicer.)

The apple mix had to sit for a little – I may have to rearrange the order of the steps – prepare the filling, then roll out the pre-made crusts while it sits (stews).

Transferring the upper crust onto the pie was tricky, we tried flipping it from the wax paper, but a chunk fell off and we got it off center. We managed to move it into place and pinched the overflow of the bottom crust to fill the gaps.

We will definitely need practice making pie crusts and transferring them, but I think we managed okay for our first pie (perhaps , if we use overlapping wax paper, we can hold it above the pie, and pull the paper out from either side, once we have the crust down…)

We baked the pie in the middle rack, with a rack below it with an empty cookie sheet (to catch any filling spills – luckily there were none.) We baked it for 30 minutes, checked for doneness, then , because the apples inside weren’t soft enough yet, but the edges of the pie were already browning, Lila put pieces of foil over the edges, and we baked it for another 10 minutes.


Tasting the pie had to wait until the next day: it was 10 pm as we wrapped up, and the recipe called for 3 hours to cool.

We would do better, we think, if we pr-mix the cinnamon and sugar that get sprinkled on top of the pie, we'd have fewer spots of concentration of just one or the other. I found the pie to be a little bitter (though I was alone in this opinion). I think this was due to the extra lemon juice we added.


Given the trouble with the large crusts, we may also consider small, individual pies or tarts, or apple turnovers where we don have the transfer to the pie dish issue. All in all, I think we found a keeper, now we just need to find a nice vegan ice cream and serve it up a la mode.


New tools / ingredients: 9" round glass pie pan
Recipe used: The Joy of Vegan Baking
Co-baker: Lila
Date: March 28th and 30th

Solo Mission -Birthday Cake: Chocolate with Raspberry Chocolate Ganache revisited: 4/3/10

For Alison's birthday she requested I make the Chocolate Cake with Raspberry Chocolate Ganache that we made last year. As we go, I've been making copies of the recipe we're using for my notebook, and jotting down notes on the page as we go, ideas for improvements, details of what oven and pans we used, etc. I pulled out the recipe / notes we had made, and discovered that for the ganache, I only had a list of the ingredients, sans instructions. I found copy of the Chocolate Ganache recipe and printed it up on its own page, ready to add to my ever-growing notebook.

Once again I doubled the recipes, as I wanted to create a two-layer cake, and not a single cake. I mixed the dry ingredients in a bowl, and the wet ingredients (sans vinegar) in another. Keeping in mind the trouble we had our first attempt with the multicolored spots, I made sure to thoroughly mix the ingredients when I added the liquids, and even more when I added the vinegar. The batter did turn out 2-tone and bubbly as the vinegar reacted with the baking soda. I mixed thoroughly, almost longer than I was comfortable with.

I split the batter between two cake pans, my "classic" 9" round x 1 1/2" and my brand new round (no handle) no-stick 9" round x 2". I put both in the middle rack. the 1 1/2" pan was done with 23 minutes, but an additional 8 minutes were needed for the larger pan.

I made the ganache as the cakes were in the oven, heating about 1/3-1/2 cup of raspberry preserves on the stove a little, and mixing it in the ganache. Once I had mixed everything, I took the pan off the heat, covered, and let it set at room temperature while the cakes finished and cooled. The gancache ended up being a little chunky, and I'll need to heat the preserves a little more, to make it mix better.

When the cakes were done, I placed them on a wire rack to cool and walked away for several hours. They turned out well, and both came easily out of the pans, once they were cool. The ganache also went on easily, driving home the lesson of patience, letting the cakes cool completely.


Since Alison wanted a first book/movie Harry Potter cake, a la Hagrid (aka, lopsided), I tried putting the two tops of the cake together (thinking the round sides together would create the desired effect) but the the difference was too big. I flipped the top cake over (made in the 2" pan) and set to slicing a wedge off the bottom. Flipping the cake did result in less ganache between the layers, though.

Once the piece was settled, I realized the top cake was had a slightly larger diameter than the bottom cake (a good indication I need two identical pans) and worked to trim the edge off the top cake. This left the side a bit crumbly, and harder to ice, but with my new offset spatula, the room-temperature ganache, a lot of persistence, and a little creativity (using the ganache in layers to fill in the lopsided bits) I think the finish product turned out okay. Happily, Alison agreed.


New tools/ Ingredients: 9" round x 2"; off-set spatula
Recipe from: Mountain-High Chocolate Cake: Student's Vegetarian Cookbook, Revised
    Rich Chocolate Ganache Topping: Vegan Cupcakes Take Over the World
Co-bakers: None
Date: April 3, 2010

Monday, February 22, 2010

Solo Mission: Raspberry Oatmeal Bars - Jan. 2010

After reading through the fun and educational bits of my newest cookbook, "The Joy of Vegan Baking," I was itching to try a recipe. I flipped through to the cookies, thinking I'd find a simple recipe, and discovered the recipe for Raspberry Oatmeal Bars. Not only did they look delicious, but I also had all of the ingredients called for on hand.

Taking a handy hint from the cookbook, I measured out all the ingredients into separate small bowls first, then as I followed the recipe, added and blended the ingredients as called for. Though, I know, intellectually, it takes the same amount of time to measure ingredients anywhere in the process, I was amazed at how much more efficient this made me feel as opposed to measuring out ingredients as I went.

The recipe was really easy to work with, and I cleaned as the bars baked. The only thing I did differently from the recipe was to cut the bars in half again once I cut them into 8. The larger pieces were perfect for granola bar sized treats, but I wanted to share my creation with more than 7 people, and I felt that the smaller square treats were just sweet enough, while eating a whole serving from the original recipe might be overwhelming.

My co-workers were my test audience for my baking, and the result was that I had to bring three copies of the recipe to share. The recipe calls for raspberry preserves as its filling, though mentions any fruit spread/ preserves/ butter will work. I look forward to trying this recipe again to see what other delicious combination I can come up with. All in all it was a simple, but delicious recipe, and one where we could change the fruit filling to fit the seasonally. Of course, I'd serve up the more generous sized serving if and when we start our cafe.


*Since my learning isn't limited to the times when I bake with my friends, I decided to also report the times when I bake alone. I won't go into as much detail on these entries and will identify them as "Solo Missions."

Friday, February 19, 2010

Stocking my Kitchen: Supplies

As time has goes on, I find that more and more I want things for my kitchen. Maybe this really means I am a baker at heart.

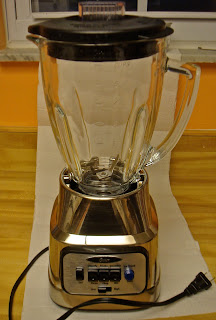
This past holiday season has been good to me, as I got many fun goodies for my kitchen for Christmas and my (January) birthday. The big shiny from Christmas was the new blender from my parents. This was actually a gift for me and my husband - our old blender, while still functional, had developed a crack in the plastic blender jar. It was used primary for making milkshakes, and you always lost some of the shake through the crack as the blades whirred away. The trick was to pour the milkshake into glasses as soon as you could, but that only minimized the mess. Our new blender is pretty, (and see how the jar is glass - it won't crack unless we drop that sucker):


My mother-in-law got me a "Perfect Brownie Baking Pan" (www.perfectbrownie.com), you know, the ones that have the divider that sits in the batter, giving you 18 identical all-edges brownies (or I suppose cake slices). My sister-in-law christened hers making brownies for Christmas dinner, and I was thrilled to see the other feature, where you place the pan on it's stand, and then the side of the pan slides sown and away, leaving you with just a tray of a dozen, divided treats. I can't help but wonder if the brownie recipe we tried last year would benefit from this pan. I'll have to try out that recipe, (or another brownie recipe) soon, it looks like a truly fun culinary toy.

In early January I treated myself to a belated-Christmas / early-birthday present (using book-store gift cards and coupons from the rewards program). I am now the proud owner of my own copy The Joy of Vegan Baking. And I am a very proud owner. I read all the non-recipe tid-bits in the book in the car when we took a day-trip. I was gushing over the information with my travel companions. I was chiming in and making copies of pages on different sweeteners in response to a conversation with my co-workers. I have nothing but good things to say about this book.

Then, for my birthday my sister got me a sifter and a pastry blender. Like me, she remembers the sifter my mom had, and how our hands were always sore from squeezing the handle to get it to sift. And to my delight she found a sifter that has a turning handle. I was able to use it right away in making my birthday cookie-cake, though the pastry blender had to wait to a different recipe to be used.


And while it's not new, I recently re-discovered a food processor in my pantry that my mom gave me a few years ago. And man, that thing is a big ball of fun and scary and useful all rolled into one.

I bought parchment paper the first time to make the cookie-cake as well, and while I've been baking this year, I find that as I go my wish-list gets longer. Luckily I shared some of my desires with my mother on a recent visit and discovered she had extras on had. From her generosity I scored from her a second set of measuring cups (a fantastic retro-green), and a 3-canister set that will be ideal for flour, sugar and, well, I'm still working on what will go in the third container. These are a pretty blue with a cool design on the side.


There are still other things that I want for my kitchen. I know I can get by without them, I have so far, so I won't say "need," but in the case of some of them (like the replacement cake-pans, my old ones are on the verge of rusting) I'd just feel better about having them.

My Wish List (so far)
  • better cake pans - currently have two 9"-round pans, one is usable, the other, I think I'd only use to heat frozen things in
  • cake saver - A dinner plate and my large mixing bowl are my temporary solution
  • candy thermometer - just want one, no particular reason
  • double boiler -see above
  • More measuring cups / spoons - Half achieved, Thanks Mom. Now on the hunt for more measuring spoons.
  • kitchen scale - to prevent things like the possible probable too-many-carrots problem with the carrot cake
  • immersion (hand-held) blender?? - Not sure I need this, but it would make mixing the Ener-G egg replacer and the flax seed in easier without losing stuff to the sides of the blender jar. I'd love to take Lila's for a test-drive before investing in one of my own.
I'm sure as I go I'll find even bigger, and more exciting toys for my kitchen, but right now I'm excited for what I have, and saving up for the rest. Wish me luck!

Thursday, February 11, 2010

February 9, 2010 - Carrot Cake and Cream Cheese Frosting

This week we reinstated the long-stalled baking night. We've switched to Tuesday, as Thursday didn't work with our current schedules, but I'm sticking with the blog name, regardless. Lila and I met at my place, with my new prize of a book "The Joy of Vegan Baking." I had selected the Carrot Cake and accompanying Cream Cheese Frosting recipes, and had purchased the missing ingredients. I am kinda happy that my spice collection is growing with this effort - Ground Cloves and Ground Allspice are now part of my spice bragging rights.

I was worried about how to get "finely grated" carrots, thinking at first a zester would be in order. Lila pointed out that was probably *too* fine, and that zesting a carrot would take forever. When I was setting out ingredients, I had the fortune to look over the little blurb at the top of the recipe, where it recommended that the shredding blade on a food processor was a good way to grate carrots. And I have recently re-discovered that I actually OWN a food processor, have for years, just haven't used it yet. Boy-howdy, it is fast. The carrots were shredded in less time than it took us to figure out how to assemble the parts to make the blade work. The one problem with the processor (and this may entirely be that we somehow assembled it incorrectly, but magically in a way that still functioned) is that the grated carrots didn't seem to want to come out of the processor. Rather they preferred to hang out between the blade and the other piece we had in there. Once I realized this, I was able to fish out the carrots that stuck.

It was like carrot confetti in my kitchen for a while. And, even though I had already made two of the recipes, I finally christened my newest cookbook. A faintly orange spot now graces the carrot cake page. Using a half-cup measure to get to 1 and 1/2 cups, I realized I didn't know if carrots counted as a dry or a liquid. I also realized that grating them by hand would have made for less densely packed shredded carrots, and a kitchen scale has joined the ranks of things I desire for my kitchen (the recipe was kind enough to tell me 150 grams of carrots, if I'd had any way to measure that). As it stands, our cake may have ended up extra-carroty.

While I played with carrots in the Oskar, Lila chopped walnuts. With those two ingredients prepared, we measured out most everything else into separate bowls, with the exception of the spices. The amounts of those were small enough that having a separate dish for each would have been excessive. I used my new blender to mix the ground flax-seed and water until it was getting goopy in an egg-like consistency, and then blended in the oil from there. While I worked with the wet items, Lila prepared the dry items into a bowl. Once we had the wet and dry mixes ready, had the cake pan greased (new cake-pans are another thing on my growing wish list), and the oven preheated, we mixed the entirety of the ingredients, then pressed them into my old, on-the-verge-of-rusting 9" cake pan (my glass 9" square pan was in the dishwasher). I was careful to place the cake in the center of the lower rack, and then we cleaned up the ingredients, and measured out the sugar for the frosting.

I was quite excited when I received a sifter for my birthday, and the immediate use I got from it. Lila sifted the confectioner's sugar while I changed out the attachments on the food processor, replacing the grating blade for the cup and spinning blade. I added the cream cheese to the cup, measured in the vanilla, and then Lila added the sifted sugar. We learned (the messy way) that we should have added the sugar first. We lost a fair bit in the transfer, and had to make a best guess at how much to add once the mix was done. Again, my hand-me-down food processor is fast. We blended the ingredients for maybe 20 seconds. Maybe. And what we got was practically liquid. No spreadable frosting like we were expecting. It was more like an icing. Something to drizzle on, not spread. This would turn out to be a fortunate thing, though at the time we were disappointed. But lesson learned: if you want frosting, woman-up and mix it by hand. Food-processorize icings only.


We added some sugar to try to stiffen the frosting, and in vain I stuck the entire bowl in the fridge while the cake finished baking, and cooled. We checked the cake 5 minutes before time, and again at the given time, and again 2 minutes later. It was still kinda soft in the middle, but the edges were getting very dark and pulling away from the pan, so we removed the cake from the oven and placed the pan on a wire rack. After a while we decided to turn the cake over onto the wire rack to cool outside of the pan. That's when things got...interesting.
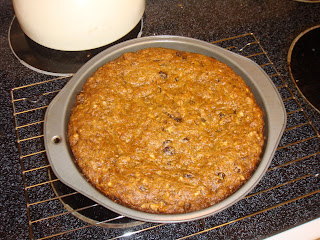


Our cake was very, very moist. It fell out of the pan. Well, two-thirds of it did, folding in on itself, and third stayed firmly stuck in the pan. We looked at what had become of our so-recently beautiful cake, and couldn't help but laugh. And take pictures. We scooped what we could onto a plate, and as pieces of the very moist middle fell out, we plopped them back in place, trying to create the illusion of a single cake. I pulled the liquefied frosting from the fridge, and we drizzled it over the cake-crumble. When we were done it looked sorta like a plate of cinnamon rolls. Sorta.
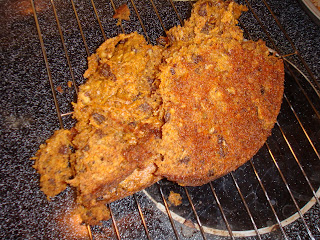
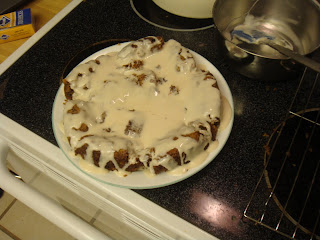


We tried the cake, and found it to be delicious, giving it a 8 of 10 points for taste. 2 of 10 for appearance. Lila said our trial was 50% cake, and 50% failure. I called it beautiful, in a tragic way. Between bouts of glancing at the cake and laughing, we tried to puzzle out what happened, and how we might avoid the same occurrence in the future.

Possible culprits and solutions: too many carrots; too little of the flax-seed mix getting in the actual mix (we had a fair bit stick to the edge of the blender, and not make it in the batter); put the oven rack in the center, or the upper rack, not the lower; use those cake-pan wraps that help keep the edges from heating faster than the center; add more flour; use a square pan, not round; try using the egg replacer instead of the flax-seed. Or Lila suggested we could try the recipe with a muffin pan, sans paper liners. As for the frosting/icing issue, I'm not to worried - we have made a successful cream cheese frosting for an earlier project, so I know we are capable.

Despite the tragic appearance of the end product, I had a lot of fun getting back into baking again. I have not laughed this much in a long time.

Tuesday, May 05, 2009

April 23, 2009 - Doughnut Holes

In Alison’s office they have doughnuts on payday, but one of her co-workers is vegan, and doesn’t have the chance to partake of this tradition. In light of this, she requested that we try to make vegan doughnut holes that she could bring in on the next payday, which happened to be Friday, April 24. It sounded like a delicious challenge.

This week we had a friend of ours, Karen, visiting, and invited her to join us. She showed up as we were frying our first batch, and helped shape the doughnut holes for our second batch.

Alison had spied a recipe online for making doughnut holes, using biscuit dough. Unfortunately when she went to print it, she found that the recipe had been pulled. Some searching revealed another doughnut hole recipe, from which we tried to recreate the recipe she had found, using the new one to get information on how to do the actual frying.

Research showed that the Heart Smart Bisquick is vegan, and using soymilk, we make the biscuit dough using the recipe on the box. The dough ended up quite sticky, and a little hard to work with, and we believe that using almond milk might fix this problem, based on Alison’s previous experience. We rolled the dough into balls, the batch making 11 doughnut holes. Because of the extra Bisquick needed to get the sticky dough off our fingers and the cutting board, the balls were less than smooth, creating fault-lines in them.

We had an 8-quart pot to which I had added all of my vegetable oil, then all of my canola oil, in an attempt to have enough oil to cover the doughnut holes. Lacking a thermometer to test that the oil was to the recommended 350 degrees, we used little bits of dough to test the oil. When it got to the point that the test dough rose immediately to the top of the oil, bubbling, and starting to brown almost instantly upon dropping it into the oil, we knew it was hot enough. We then added our doughnut holes to the oil. They weren’t quite submerged, and we kept rolling them to make sure they cooked all the way through, and evenly on all the sides. We watched as they expanded as they fried, and we realized that our 11 doughnut-hole sized treats were expanding into monster treats.

Once they were done frying, we fished them out of the oil, turning the heat down, but not off, and put them on a paper towel briefly. Then the still-hot monster doughnut holes were put into a paper bag which had a confectioners sugar / cinnamon power mix. Shaking the doughnut holes in the bag, they came out nicely coated, but we added a second paper bag to the outside, after the first go-round, as there was a little bit of mess from the attempt.

For our second batch, we made the same biscuit dough, but made the raw doughnut holes much smaller, yielding about 4 times as many as the first batch. Aside for some small burns from splashing oil (I’m very sorry, Lila), these worked much better.

The larger doughnut holes were a little damp in the middle, while the smaller ones cooked faster and more thoroughly. We found that the more oil was on the doughnut holes when we put them in the bag of sugar and cinnamon, the more coating they picked up, but the less like traditional doughnut holes they looked. The oil had the effect of making a paste-like coating, which tended to break off the treats when handled. With less oil on the doughnut holes, the sugar was more of a light dusting, which had a more firm hold on the treats.


This recipe will take some practice to get a consistent treat, but the only adjustment we might make to the recipe itself is trying almond milk or rice milk to see if either yields a less sticky / easier to work with dough.

April 16, 2009- Chocolate Cake with Chocolate-Raspberry Ganache

Every bakery worth its salt needs a good chocolate cake recipe. While this was the first chocolate cake recipe we found and have tried, we may have the winner we were looking for.

Baking this Thursday was at Lila’s apartment, and one of our girl friends, Allyson, who had a week off from her job for spring break, joined us. She was mostly there to hang out, but we put her to work in the kitchen, as well.

We worked with the in-the-pan Mountain-High Chocolate Cake recipe Lila found in the cookbook Student's Vegetarian Cookbook, Revised. Since the recipe is designed to yield a single layer cake, and we wanted to have a two-tiered cake, we simply doubled the recipe, making one batch in each of our borrowed 8-inch pans (thanks Allyson for bringing these).

When we settled in to start, we realized that we were missing an ingredient, and while Lila’s boyfriend went to pick up said ingredient, she and I set to making the chocolate ganache that we were going to use in lieu of icing. The ganache was simple (found in Vegan Cupcakes Take Over the World), with few ingredients, just heating them on the stove until the semi-sweet chocolate chunks melted. We were happily surprised to find out that Baker’s Semi-sweet baking chocolate is vegan, and we used an entire box, as we made our double batch of chocolate ganache. When it was done, we put a lit on it, and moved it to a different burner, figuring we didn’t want to refrigerate it, less it harden to a point where it wasn’t usable.

Once the last ingredients arrived, we set to making the two single-pan cakes. Alison on one bowl, and Lila on the other, we had Allyson narrate the recipe while I helped prepare the ingredients to go into each pan. The addition of vinegar activated (caused a reaction with) the baking soda, and since we wanted the cakes to be as identical as possible, we measured out the vinegar for one pan into a small dish, and added it to one pan as we used the measuring spoon to add to the second pan at the same time. Alison and Lila mixed these in, and we opened the oven for the pans to be added at the same time.

We used damp pan liners to prevent the edges from cooking much faster than the middle, but both cakes did rise / were puffier in the middle, as cakes tend to be, but it wasn’t too bad. The addition of these pan liners did add about 5 minutes to the cooking time, however.

We placed the cakes, in the pans, on the cooling racks, but after a while our impatience got to us, and we deftly (after Alison came up with a method to do so) flipped the cakes out onto the cooling racks directly. This did result in what looked like grill lines on the tops of the cakes. We did notice, as the cakes cooled upside down that some of the flour and dry ingredients were stuck around what were the edges of the pan, and didn’t mix in properly. If we continue to use this recipe, or if anyone else uses it, I recommend making doubly sure that the edges of the pan are paid special attention to when mixing the ingredients. It was like the little pockets of dry hid under the other ingredients.

We thought about putting raspberry preserves between the layers of cake, and using the ganache to ice the outside, but as Lila heated the perseveres, we decided to add it directly to the ganache. This made a delicious mix, but made the ganache a little more liquidy. In the future, we’ll add the preserves when we are making the ganache, and let the mix cool to room temperature before using.

Wanting a smooth edge to ice, and not having a device to trim the top off the cakes, we placed them top-sides together, with ganache between, and then icing the outside. Because of the slight puffiness, this meant there was a small gap around the edge of the cake, which we tried to fill with extra ganache, but when all was said and done, you could still see the gap.

While the cake was not perfect in appearance (in fact, a fault line appeared in the top), it was wonderful tasting. The addition of the raspberry to the ganache made it extra extravagant. We’ll need to work on the art of building a pretty cake, but I think we have a great tasting vegan chocolate cake recipe to add to our menu, and perhaps with some tweeks, a base for a brownie recipe, as well.

Thursday, April 23, 2009

April 9, 2009 - Vegan Cupcakes and Frosting

Once a year Library West on campus hosts an Edible Book Contest "where the only rule is it must be edible and must be somehow related to a book!" The entries are put on display in front of the library, and the general public is invited to help judge. In the past, once the judging was over, everyone present was invited to partake of the entries. When word got to us about this year's contest, Lila, Alison and I decided to enter with an entry inspired by "Vegan Cupcakes Take Over the World" - the idea was not only to get our name out there, but to also provide an entry that anyone of the general public judges could eat.

Our concept was to use the recipes in the book to make mini-cup cakes, and to make a hemisphere cake (to represent the world), which the mini-cupcakes could then overrun. Because it was our first time trying either mini-cupcakes, or the hemisphere cake, we decided to do a test run on cupcakes this week. Since the contest was on Thursday, we'd have to get together earlier in the week (Monday was the only day that worked for all of us) to make the entry, so we'd be making the trial and then the real thing a mere 4-days later.

I was a little disappointed to see that "Best Non-Fiction" had been removed from the categories, but the big disappointment came when, once we submitted our entry form, I was sent a thank you along with more detailed instructions for the contest. Including how, unlike past years, the entries were to be picked up by the participants, and not fed to the general public. This, combined with the fact that our cakes would be past their prime, discouraged us from entering this year. We didn't need to feed our friends the same cupcakes two weeks in a row.

So, with the Edible Book Contest off our agenda for this year, we still decided to try recipes from the Vegan Cupcakes Take Over the World, which we borrowed from our friend Rusty. There were many delicious looking recipes to choose from, but we finally decided on the coconut lime cupcakes. I accompanied Alison to the grocery store the day before to pick up ingredients, and we were frustrated in our search for coconut oil and non-hydrogenated shortening. A decision on the fly, we decided to make the chocolate-marble cupcakes instead, with orange butter cream frosting.

Still eager to try the mini-cupcakes, I borrowed the mini-muffin pan from my sister, and bought the itty-bitty pan liners we would need.

On Thursday we got set up at Alison's place, mixed the ingredients for the cake (taking turns adding things and reading the recipe), and then split the batter into the directed portions. The smaller batch became chocolate, and would be used to marbleize the regular cupcakes. The directions call for adding both the vanilla and the chocolate batter at the same time, side by side, then using a tooth-pick to swirl together. With both Lila and Alison adding the batter, I think we had it easy- the hardest part was not getting the batter to drip on the pans. We noticed the chocolate portion of the batter was more liquid, so Alison (manning the chocolate side of things) had a bit of an easier time of things. Once the mini-cupcake pans were filled, we used the remainder of the batter in 5 "regular" sized cupcakes. While the recipe says that there should be more vanilla batter in the end, we found the opposite was somehow true for us - a full sized cupcake's worth of chocolate batter, with a small vanilla heart on top.

It was my job to mix/marbleize the cupcakes, though we did choose to leave some half and half, since the division between the vanilla and chocolate was so perfect. In the end, once the baking was done and we were tasting our product, I realized I didn't mix them nearly as well as I thought I did / as I should have. For the future, more swirls are preferred.


While the cupcakes were baking (the mini-cupcakes were done in less than half the time listed for the full sized cupcakes -but since we bake with the oven light on, we were able to make the judgment call as to when to pull them out of the oven), we set to making the frosting. We decided to make two different butter cream frosting, and since the base was the same, we just added the whole amount of shortening and margarine to mix together, then split in half as best as we could. We then added the half-amount required of the other ingredients. As Lila mixed the base, Alison took the orange butter cream frosting (juicing an orange, and using orange zest instead of the lemon zest) and I mixed the ingredients for the chocolate butter cream frosting, accidentally adding too much vanilla.

When it came time to taste test, we discovered that the smaller cup-cakes, at least, were sweet enough without frosting. I think everyone liked the orange frosting just a bit better than the chocolate (even those whom we shared the cupcakes with later). In the future we'll try the lemon zest in the orange butter cream frosting (as the recipe called for) since we noticed the frosting got a little bitter after the first day.

So while we didn't end up making these cupcakes a second time, as entry for the Edible Book Contest, we very much enjoyed them, and I consider this evening's baking a success.

Saturday, April 11, 2009

Sweet Thursdays Blog Introduction

In the grand scheme, I suppose this blog introduction comes a bit late, the fifth post in, rather than the first, but what you don't know is that I secretly backdated all the previous 4 entries to coincide with the date the original post was made in my personal Livejournal account. It wasn't until after the third post that I decided that perhaps I should use a separate blog to post my musings on vegan baking.

Long story short, I dusted off my little-used blogspot blog, and revamped it, added my thoughts of our previous baking expeditions, and viola, this blog.

A bit about me and the project that inspired me to venture into vegan baking.

A library staff member by day, and an avid writer, reader, watcher of Anime and TV at other times, January found me in Denver for the American Library Association convention along with two of my girlfriends. (Fun factoid - each of them has rented the spare room in our house at one time or another, so they are both former roommates).

The first morning we went to sign in, and find some breakfast. Alison and I were able to grab some pastries at a coffee shop in one of the conference hotels. Lila, who is a vegetarian who also does also not eat eggs (called a Lacto Vegetarian, as I just found out), was unable to find anything at the coffee shop that did not have eggs in it. The clerk could not even verify if the bagels (which usually don’t have eggs) were egg free. We went to the conference center information desk, and asked after vegan dining options (figuring that vegan food would fit the egg-free requirements, and then some). First we had to explain to the information assistant what we meant by vegan.

We were finally pointed in the direction of a supermarket that might have something that was suitable, and given the Einstein Brothers bagel company as a landmark. Bingo. The Einstein Bros became our breakfast spot for the rest of the trip.

As we were walking we got to talking about how difficult the seemingly easy task of finding food had become. Imagine if any of us had been vegan (as our friend Rusty was). Very difficult especially with baked goods – doable, but most vegans can’t just order a baked good at a café or restaurant. At best they have one or two items on the menu that they can eat. That turned us to the idea of creating a café that had two menus, one “traditional” menu, and a parallel menu with the same items, but vegan.

Over time the idea morphed, through several variations, to where it currently stands: Try to open a green, vegan café in our hometown in the not-too-distant (but not too near) future. It idea may change as we go, every time we meet, we toss out new ideas (from menu items, to wardrobe, to decoration of the place, and more). We looked at what skills we’d need for the business side of things, and are considering several business education options. We also realized we would need to find suitable recipes, and since that seemed like the step that would take the longest, was the easiest to get started on, and pretty fun, we settled on trying to meet once a week to bake a new recipe, try out teas, etc.

I was pleased to learn that Alison and Lila are awesome when it comes to baking, and are intuitive about flavor adjustments, and how to fix recipes where I would just sit there in a stupor wondering what went wrong. So we get together, bake, taking turns with the steps, and reading the recipes, and then we sit down to sample our creations. As Lila and Alison toss out ideas on how to make the recipe better, or bring out different flavors, I diligently take notes (something well suited to my personality, actually). It was an easy transition from that to posting the stories of our meetings on a blog.

So that is what this blog is – it will be primarily a recording of our baking days, which we have as a standing date every Thursday, but will also include ideas we have for the café, in general, as we make progress on that front. We are looking forward to the café, however we realized we do have a ways to go to pull together a satisfactory menu, in addition to learning all the practical, business side of things. Given the current state of the economy, perhaps it is wise we are looking at years or more down the line before we introduce our green, vegan café to the world.

If you have questions about the recipes we make, or any part of the process, I invite you to make comments. Likewise, I’m more than happy to accept comments, suggestions on how to fix our baking problems, recipes we must try, etc. All I ask is that you be respectful to me and others who may comment, and I’ll treat you the same.

Thursday, April 09, 2009

Vegan Scones and Devonshire Cream - April 2, 2009

Last Thursday was the first time our happy group was able to meet for a while, and it was the very first time that I was in charge of finding the recipe, not just the ingredients. In addition Jivi, a childhood friend of Lila's, whom Alison and I also know thorough my writer's group, was present, and helped with the baking and taste trial.

I searched several websites, and finally chose one scone recipe that was the winning combination of easy and tasty-looking. From there I did a separate search for vegan clotted cream, and ended up with a vegan Devonshire Cream recipe (now, I'm not really hip on creams, and I couldn't tell a hawk from a handsaw if you wanted to know if clotted cream and Devonshire cream are the same thing, or two different recipes in regular terms. All I know is when I did searches for "vegan clotted cream" this is the recipe I found.)

When I got home from work I did a final clean up of my kitchen (it got a thorough cleaning on Tuesday, after the small kitchen fire I set in a tea-making mishap), and set out all the ingredients for the scone and cream recipes. I had also bought berry preserves (with Pectin, not gelatin), and fresh strawberries, half of which I macerated (cutting up the ripest berries, and tossing them in a Ziploc bag with sugar).

Alison worked on making the cream, while Lila pulled the ingredients together for the scones. Jivi read the recipes, and I put the ingredients away as they were used, scurried around to get measuring cups, preheated the oven, and did general clean-up.

I am very fortunate that Lila has experience with scone recipes in general. After half the liquid was added, she realized that the dough looked to wet for scones, and didn't add the second half. The result was a very muffin-like batter that yielded 8 fair sized drop scones (there was no way the dough would hold together for the stretching and cutting the recipe called for), instead of 20 uniform scones.

We worried for the scones as they baked, and decided, upon tasting, that they a) were very buttery b) had a bit of a tang (which Alison, Lila and Jivi all identified as the baking powder). They weren't bad, for having such a wacky recipe, and we decided that if we use this scone recipe in the future to make the following adjustments: add 1 cup of flour, use all the liquid, add 1 tbsp more vegan buttery spread, a bit more sugar, but definitely no more baking powder.

The cream was also a bit buttery, given that it was a mix of buttery spread, Tofutti Better Than Cream Cheese (plain - though when I bought this, I almost got the garlic and herb by mistake. Be sure to read the lid, kiddies), and confectioner's sugar. Alison added the last of my bottle of vanilla extract (about 1/4 tsp) to the mix.

We each tried a scone with and without cream and strawberries, and determined they were, despite everything, quite tasty. However, given the small yield, and the extra baker, that meant that our gaming group and various significant others were disappointed to discover there were no yummy treats for them to taste test.

It also got me thinking that it is time to start trying teas.

Of course the talk turned to what else we could do with the scone recipes, different extracts we could add (lemon if it is any sort of berry scone, almond, etc) and perhaps exploring ivory scones (which I've never had, and the idea intrigues me.)

Once again, I am amazed by my baking partners, and grateful for their knowledge and general baking sense. Hopefully next time I am in charge of the recipe I'll find one we don't have to modify on the fly to make it work.


Image of the Devonshire Cream - the small batch of scones were reduced to crumbs and smiles before I remembered to grab my camera

[Scone recipe at vegweb.com: Super Easy Scones ; Clotted Cream recipe found at Vegan Yum Yum: Lemon Maple Scones with Vegan Clotted Cream]

Tuesday, March 24, 2009

Vegan Cookies - March 12, 2009

Lila was in charge of finding the cookie recipe that we would try, and thus we had our Thursday cooking meeting (one week late due to personal conflicts) at Lila's house. She found 3 recipes online, I printed copies, and brought those and my cooling racks over to her place. The idea of using the leftover frosting from the cupcakes went out the window as we figured the lifespan of the frosting had expired. I did bring the leftover vegan semi-sweet chocolate chips from when we made brownies.

We spread out the 3 recipes on the table, considered the ingredients we had compared to the ingredients in the different versions, and picked which recipe we'd try first. While we pulled out the right ingredients from the multitude of things Lila had spread out, we decided that the next time we tried cookies, she would get the recipe her mother uses.

Alison put together the dry ingredients while Lila mixed together the wet, and I stood away from the crowded counter space calling out to them what to add next to each respective bowl.

At first glance we picked the most difficult recipe - there wasn't even white space on the single sheet / single spaced page for me to jot my notes (though the back of the sheet sufficed for this). The truth was this was the quickest recipe we've done yet.

Alison created a well in the dry ingredients, but not big enough, we quickly saw, for the wet ingredients that Lila had mixed. Nothing to sweat over, though, as the next step was to mix it all up. We blended the dough by spoon, then separated it into approximately half, once we had a good mix. Half the batter got the left-over vegan semi-sweet chocolate chip cookies - that dough made a dozen on one cookie sheet; the other half got craisins (dried cranberries) and almond slivers. That made a batch of 11, fulfilling the recipe's promise of "Almost 2 dozen cookies."

Because of the ingredients we added, and because of the individual touch (making each cookie by hand), we came up with a batch of cookies that were of inconsistent size. We decided that in the future we'd pre-make the dough, roll it into a standard size, and freeze it (for just a couple of hours, to let it set) so we could then slice cookies from the roll and have consistent cookies (the guess was for about 1 cm thick).

Following the recipe we put both pans in to bake, then half-way through the baking process we switched which pan was on the top, which was on the bottom, and rotated them 180 degrees. We ended up leaving the cranberry almond cookies in for a bit longer, and the chocolate chip cookies were in for an additional 2 minutes.


This recipe didn't call for egg or egg replacer (as the other recipes did), but seemed to just substitute oil in (we followed the recipe exactly). In the future we may try replacing some of the oil with applesauce, reducing the oil, or just finding another recipe. The first taste of these was oily. The cookies were good, otherwise, though in the future, if we keep Cranberry Almond on the menu, we'll try adding almond or lemon extract. (We'll try both, but not at the same time).

We took the cookies to gaming, and once again we discovered that the day after our baking, the treat tastes better. These particular cookies were soft to the point of crumbly, and though the day after was tastier, it was still a bit too oily for our preferences. I think something other than straight oil would help with both problems. We will definitely look into other cookie recipes, and keep in mind the trick of working from rolled dough to have more consistent size cookies, all the easier to sell, and to adjust the baking time.

[Recipe found at VegWeb.com, Happy Vegan Chocolate Chip Cookies]

Monday, March 02, 2009

Vegan Cupcakes - Feb. 26, 2009

Last week's vegan baking experiment was Vegan Cupcakes - Red Velvet Cupcakes with a Cream Cheese frosting, to be exact.

I never knew that Red Velvet cake (and therefore cupcakes) were secretly chocolate, but the recipe called for cocoa powder, and I brought that, as well as some of the other cross-over ingredients from the brownies (such as the organic unsweetened applesauce, and the soy milk I had on hand and open from a previous baking exercise), a large mixing bowl and my muffin pan over to Alison's place. She had bought the rest of the ingredients, and I think Lila, Alison and I determined we'll try to do cross-over recipes as close together as possible, to help maximize use of common ingredients in a timely manner. Also, we've decided we'll all have on hand flour and sugar at all times - because really, when baking, those are pretty much a must.

When I got to Alison's place she had all the ingredients she had out, and the margarine and tofu better than cream cheese out on the counter to get to room temperature. She set out the soy milk and apple cider vinegar right away to give the milk a chance to curdle. Lila arrived, and she and I sifted the dry ingredients together - Alison had them measured out. We didn't have a sifter, but I did have a mesh strainer with a long handle - Lila poured the ingredients into the strainer, and I shook it to mix the ingredients. In lieu of a second sifting, Lila set to stirring the dry ingredients. This stirred up a lot less dust, and made everyone's noses much happier.

The recipe called for 2 oz. of red food coloring, which Alison bought - McCormick food coloring. At lunch that day my sister said "Gee, I hope that's vegan - you know that for some food coloring to get the red they use ground up beetles." This sent me on a quick Internet search to determine which reds were used in the food coloring (FD&C Red 40 and 3), and if those had beetles in them (Nope, that's Red 4). *Phew* Anyway, that was a lot of red food coloring we added to the batter. We wondered if halving the food coloring would end up with pink velvet cupcakes - an idea for October, or February.

Like with the brownies, we substituted applesauce in for some of the oil (though this time we used vegetable oil instead of canola oil). The fun part was trying to do the math. With the converted recipe we had, the note said to substitute some of the oil for applesauce, but we did not have the amount. Fortunately I had the brownie recipe with me - where 1 cup of oil was changed out for 1/2 cup of applesauce and 1/4 cup of oil. Unfortunately, the cupcake recipe called for 2/3 a cup of oil, which then involved some tricky math - and Alison pulling out her cell phone as a calculator, to end up with 1/3 a cup of apple sauce and 1/6 a cup of oil (which we had to eyeball in the 1/3 cup measure.)

The batter was very liquidy, and so we used the 1/4 cup measure to scoop batter into the cups which was perfect to fill the cupcake cups 3/4 full. We only had a few mishaps, where this blood red batter dripped on the counter or floor, but those were quickly cleaned up. We finished filling the first pan, and put it in the oven, then set to filling the second pan worth of cupcakes. We were a little more generous with these as we finished filling them, but still had some batter left in the bowl, and hey, waste not, right?

The bake time was 20 minutes, so when we finished filling the second pan, we decided to wait for the timer to get down to 10 minutes we'd add the second pan to the oven. When the first batch was done, and pulled out to cool on Alison's broiling pan (I forgot to bring my cooling racks), we started making the frosting. As we were mixing in the 4 cups of confectioners’ sugar (and wiping our brow that my box and Alison's box - both previously open and partially full - actually had enough), we discussed in the future playing with reducing the amount of sugar in recipes, to see how it affects the taste. We also discussed trying to substitute some whole wheat flour for some of the while flour (though my co-worker warns to not do more than half and half, since the whole wheat flour would make things heavier).

With the icing made, and the second batch of cupcakes out of the oven, we set to icing the first batch while the second cooled. We should have probably let them cool a bit more before starting icing, but we were eager to try our creations. One thing we noticed as a difference between the second batch and the first was that we had to put the second batch in for an additional two minutes (they were still goopy) and then the tops didn't just rise, but also spread out a bit (usually on one side) over the cups. I think that was due to the extra batter we put in those cups, but I can't rule out the fact that we were using two different cupcake pans (Lila's and mine), so there is that variable in play, also.

We iced the cupcakes, then dug in. All three of us had problems with a large part of the cupcake sticking to the paper. We pondered foil lined cups, but since all the cupcakes we ate a day later, at gaming, came out of the paper perfectly, it could have been that they were still too warm for good removal from the paper wrappers. Alison and Lila, who have a taste for this sort of thing, discussed using orange extract (or lemon) in the cupcakes, and then adding the same zest to the top of the icing. Likewise, perhaps adding nuts of some kind to the batter, then on top of the icing.

The cupcakes seemed to go over well with our test subjects, ahem, with our friends. We did have more icing than was warranted by the number of cupcakes (we'll have to look at scaling the frosting batch to match the cupcake batch), so when we try various vegan cookies (this week's baking experiment), some of them will be iced, and some will have the remainder of the semi-sweet chocolate chips left over from making brownies.

[We used the recipe found at Mac and Cheese Review for this week's baking.]

Tuesday, February 24, 2009

Vegan Brownies - Feb. 19, 2009

On Thursday last week Lila, Alison and I met at my place, and settled in with a modified recipe for vegan brownies, and to discuss our cafe idea.

We decided to make two batches, one with the vegan semi-sweet chocolate chips, one without. We used two aluminum foil 9x13 pans I happened to find in my cupboard, in order to ensure that any difference in the brownies was only the ingredients, not due to differences in pans. (I did have two "real" 9x13 pans, but only one in condition to do baking - the other is old and greasy and I only use to bake frozen fish fillets).

I had all the ingredients out on the counter, lined up in the order the recipe called for, and pulled out two mixing bowls. We took turns going down the line, measuring and scooping the ingredients into the two bowls. We took turns mixing, and as we added the wet ingredients, I let Lila and Alison take over while I put away the ingredients, a "clean as you go" effort.

The recipe, for those who are interested, was a variation that used a mix of canola oil and unsweetened applesauce in place of egg. We also added a hint of almond extract along with the vanilla extract. We realized the disposable baking pans didn't have a lot of structure to them as we went to put the brownies in the oven, and had to be very careful at not spilling them and not burning ourselves as we positioned them on the oven rack.

The modified recipe said 23-25 minutes for ooey-gooey delicious brownies. The base recipe said 25-30 minutes. We started at 20 minutes, then added 3 minutes, and another 2 minutes, and took the brownies out to cool. The edges were solidifying nicely, but when I tried cutting them, there was a large, seemingly unbaked spot in the middle of each pan, though it was a larger area on the brownies with the chocolate chips. We put the brownies back in the oven to bake another stretch of time (I can't recall if it was 3 or 5 minutes, in the end).


The edges dried out, but once again, the middle was still more pudding-like than brownie like (a lot more than "ooey-gooey" - more like "this needs a spoon"). We discussed possible solutions (playing with the recipe to get a more solid consistency, just selling the the middle as brownie pudding (there is no egg, so no worries of undercookedness), using square pans, etc). We also discussed how to improve the taste of the recipe, by adding other flavors, etc.


By the end of the night, I was brownied out (tasting both pudding-like and more solid brownies from each of the 2 pans after each of the rounds of baking = a lot of brownie). The next day we took our creation, including the brownie-pudding, to our gaming session. It was received well, and we discovered that the almond extract really was more noticeable after the confections had sat for a day.

I'm excited by our first experiment, and on re-visiting brownies - to see how we can improve the recipe, though not for a while. This week we are either working on cupcakes or cookies (determined by a thumb war between Lila and Alison - just kidding - they each are getting ingredients for one of them, and I guess we should figure out which we are trying this week, and which next week). Anyway, it gives us some time away from the brownies (though, I still have some of the brownie-pudding in a container at home, even after giving away over a pan of brownies to my gaming group).

[The recipe used can be found at: http://allrecipes.com/Recipe/Vegan-Brownies/Detail.aspx; the modifications we made were mostly found in the comments portion of the page]